logo

Tag : Zbrush

13 Jan 2015

Car scanning with Photogrammetry

A new technique we have been working on for scanning full colour reflective objects using photogrammetry.

This is our second test and there is still a lot of room for improvement, objects with multiple reflective layers such as headlights are a problem as you can see from the mesh but we should be able to solve this in the coming weeks.

For the purposes of this test we deliberately chose the hardest possible car to scan, reflective white paintwork, multicolored livery and lots of pure black shiny plastic, a photogrammetry nightmare to say the least!

CarScan01

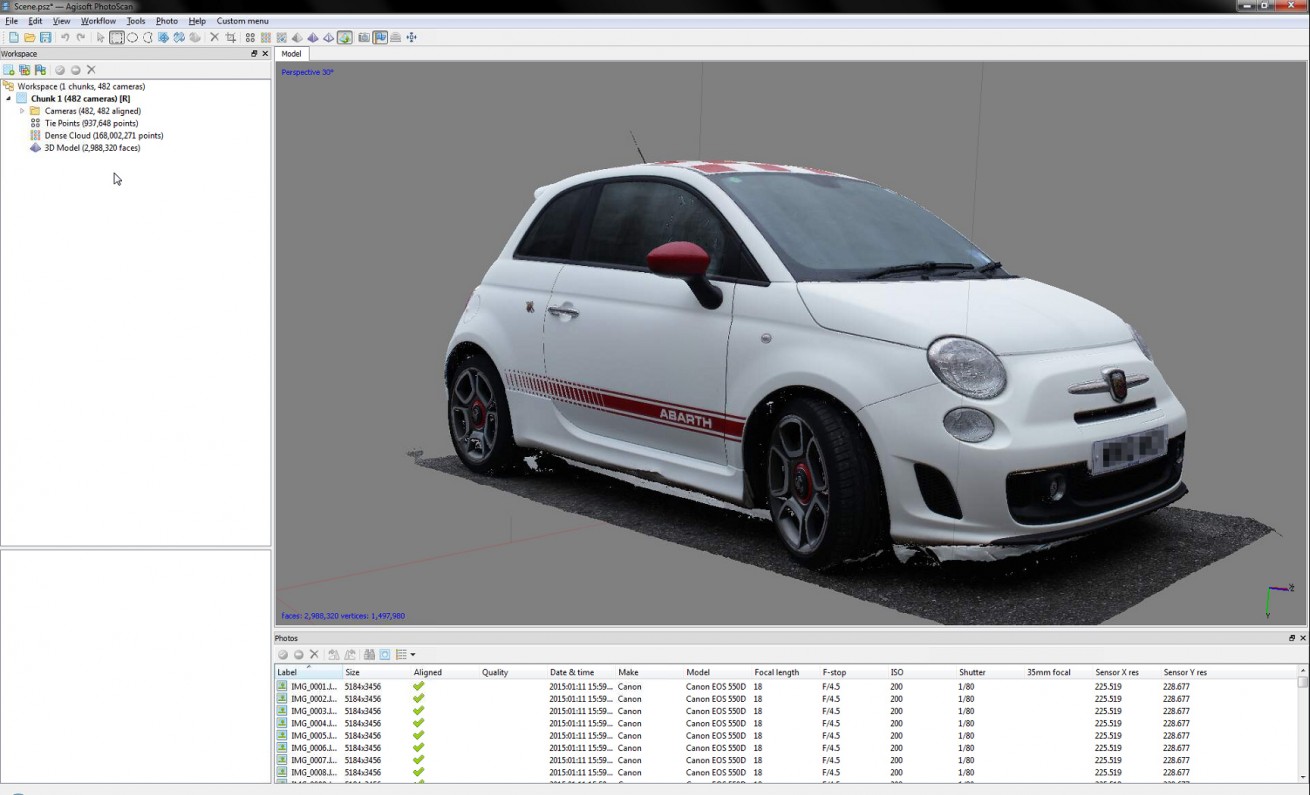
We’re using AGI PhotoScan to process over 480 images resulting in nearly 1,000,000 Tie points and a Dense point cloud of 168,000,000 points

AGI1

AGI-2   AGI-3  AGI-5

Once the scan is processed we end up with a fully textured 3D model consisting of about 11 million triangles, As I mentioned before there are still some issues with the lights and there is a lot of noise in and around hard to scan areas such as under the arches and along the bottom of the diffuser.

CarScan02

CarScan03

CarScan04


11 Jul 2013

New full colour full body scans on the store

We are proud to announce the release of our first batch of full body scans on our 3dscan store. There are 3 versions available to suit all budgets.

Click here to go to the store

Basic Version no colour £20 ::
Perfect reference for sculpting and anatomy study

  • Decimated OBJ, 750k polygon 3D scan “No Colour map”

Colour Version £30 ::
Everything you need to create the perfect full colour photo realistic character

  • Uv mapped Decimated OBJ, 750k polygon model with UV map
  • 5,000 x 5000 colour map (jpg)

Pro Version £45 ::
For those of you who want a little bit more, this version has everything!

  • Full high resolution Zbrush model with 5 subdivision levels compatible with Zbrush 4R5 and above
  • Low poly quadded mesh with normal 8,000 x 8000 normal map for quick renders
  • Decimated OBJ, 750k polygon model with UV map
  • 10,000 x 10,000 colour map (.jpg)


Full Body Scan 04

Full Body Scan 05

Full Body Scan 06

Full Body Scan 07

Full Body Scan 08

Full Body Scan 09

Full Body Scan 10

Full Body Scan 11

Full Body Scan 13

Full Body Scan 12

Full Body Scan 02

Full Body Scan 03

Full Body Scan 00

30 Apr 2013

Modo skin shading tutorial now avaliable

Click here to go to the store

Using one of our latest generation head scans this tutorial takes you through the process of creating and rendering realistic looking Skin using Modo 601.

Duration :: 70 minutes

Video Format :: MP4 H.264

Tutor :: James Busby

Required Software :: Modo 601 or higher, Photoshop, Zbrush 4R5*

Data Set includes:: Head Scan ZTL & OBJ, All Texture maps in PSD format, Final Modo scene file

Download size :: 1.5GB


Chapter 1 :: Introduction  (Watch Sample)

We look at the ZTool using Zbrush 4R5 and export the mesh and normal map into Modo where we apply both diffuse and colour and set-up the lighting.


Chapter 2 :: Sub dermal skin textures

This chapter looks specifically at the lower dermal skin texture and SSS settings.


Chapter 3 :: Upper dermal skin textures

Upper dermal and Diffuse tint textures are all covered in this section


Chapter 4 :: Specular and reflection

Learning how to control the specular highlights using very easy to create maps in photoshop


Chapter 5 :: Bump mapping

A very quick and easy way of generating great looking bump maps from the diffuse colour map


Chapter 6 :: Rendering

Rendering the fully shaded head using Modo’s preview render as well as some great HDRI lighting set-ups using SIBL